Wednesday, September 05, 2007

Create Accessor Dialog and Choose Implementation Dialog


I demo two more new LabVIEW 8.5 features in today's video.

The Create Accessor dialog expedites creating VIs that read or write class data members.

The Choose Implementation dialog helps you navigate from a dynamic subVI call to the implementation you want to see.

I find both of these features to be huge time-savers when working with LabVIEW classes.

Labels: ,

Tuesday, January 09, 2007

Designing VIs Before You Write Them

One of my readers requested I talk about the design process for the object-oriented Getting Started window.

I'm not suggesting this is a perfect, general design process for OO in LabVIEW, but perhaps some people will find an example helpful.

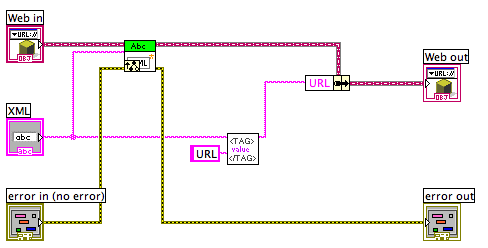
First, I identified the "nouns" in my system: the links. The Getting Started window uses a web-style UI, and the most important things are the hotspots that take actions.

The links became the objects in my design. Link became my common ancestor class.

Next, I wrote down (on paper - yes, this was all done before I started writing any code) the "verbs" for my objects. They had two primary actions: initializing their data from an XML file and taking action when the user clicked on them. These became the methods on my class.

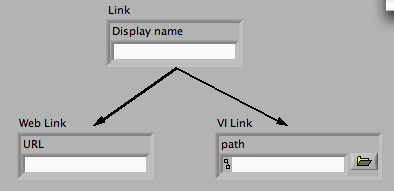
Next, I thought about the "kinds" of links I had: some opened web pages, some created VIs, some launched wizards, etc. These became classes that inherited from Link.

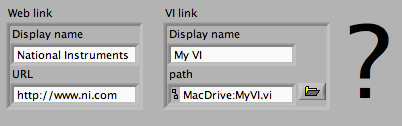
For each of these child classes, I wrote down all the information they needed in order to perform their work. For example, the Web link needed to know the URL to open. These became the fields of the class private data.

If there was a field that all the child classes had in common, I thought about whether it was an attribute of all links and (if so) put it in the parent class.

Then I hit a small snag: the Targets ring that appears when you have modules such as Real-time installed.

When looking at the information that the ring items needed, I decided to create a new layer in my class hierarchy. I made Clickable text, a child of Link, and made another child of link called Ring item. Then I redistributed the private data fields accordingly.

This was all pretty straightforward. But then I hit a bigger snag: while designing the child classes of Ring item, I realized one launched a project wizard. But it was also possible to have a clickable text link that launched a project wizard.

"Where should I put the fields for a project wizard?" I asked myself.


I could duplicate the exact same fields in the Project wizard clickable text class and the Project wizard ring item class. But that's not good. Duplication is almost always a bad sign: that means when you make a change in one place, you have to remember to change the other place as well. Sharing code between the two is better.

I considered putting the fields in the common ancestor class, Link. But that's not good, either. That would mean that all the other child classes would contain fields that were useless to them. That's inefficient, and also confusing to other engineers who want to modify my VIs later.

Ordinarily with OO design, you want to put common functionality into a common ancestor class. But the class hierarchy I wanted to use didn't allow that in this case. There was no common ancestor unique to the project wizard classes.
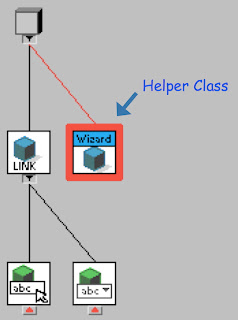
Then I realized the design pattern I wanted: delegation. I created another class (which did not inherit from Link) which launched a project wizard. Then, rather than have the private data fields in the original two classes, I gave them each a private data member that was an instance of the helper class.


After reviewing my design with another engineer, I was confident I had a good approach and started writing VIs.

Up-front design work isn't a guarantee that you won't need to change your design later (when you get new requirements or think of a better approach), but it does reduce the likelihood. When people don't take the time to design before coding, too often they will want to "stick with what they already wrote" instead of using the design they like better.

Of course, I think this applies to software in general, and not just object-oriented design. "An ounce of prevention is worth a pound of cure." :-)

Labels:

Monday, September 18, 2006

Access Scope

When you give VIs to others to use, they generally fall into two categories: the VIs that they're supposed to call as subVIs (called interfaces), and supporting VIs that they're not supposed to call directly (which are subVIs of the interface VIs).

Pre-LabVIEW 8.0, you had no way to enforce that they didn't call your support VIs. When creating a new version of your VIs, you couldn't be sure whether or not you would break other people's VIs if you changed your support VIs.

In LabVIEW 8.0, we introduced the project library, which (in addition to namespacing) gives you the ability to set private access scope. Access scope lets you distinguish between your (public) interface VIs and your (private) support VIs.

If you're not yet familiar with project libraries (which we usually call simply libraries), let me clear up a common misconception. Libraries are not LLBs. LLBs are containers, where a single file on disk contains multiple VIs. Libraries are separate files on disk from their member items.

You can think of libraries like exclusive clubs. A VI can be a member of one and only one. Being a member gives the VI certain privileges, including the ability to call private VIs in the library.

In LabVIEW 8.20, we introduced LabVIEW Classes, which also have public and private access scope. (Classes are, in fact, a type of library). Classes, however, have an additional access scope called protected.

We used that name because it's used in other object-oriented languages and we couldn't come up with a better one. It is not, in my opinion, a good name. The obvious question is, "Protected from what?" So let me try to explain.

VIs that have protected access scope can be called by VIs in the same class or descendent classes. (That means classes that inherit from the class directly or indirectly).

There are cases in object-oriented design where you simply need this ability. For example, suppose you have a public interface VI for your class, and a support VI that it requires. What should the access scope of the support VI be? At this point, probably private.

But if you then make the interface VI dynamic so that child classes can override it, things change. If you want those override VIs to be able to call the support VI in the parent class, you can't have it be private. But you don't want VIs outside the classes to call it. So you make it protected.

Labels:

Friday, September 08, 2006

Dynamic VIs and Override VIs

In order to take advantage of dynamic dispatching, you must have classes with dynamic member VIs.

A dynamic member VI is a VI that
  • is a member of a class and
  • has a dynamic input terminal.
A dynamic input terminal is the one that determine dynamic dispatching at run-time.

You can create a dynamic member VI by right-clicking on a class in the project tree and selecting New»Dynamic VI. You can also create one by creating a normal VI and configuring it to have a dynamic input. The New Dynamic VI option is just a convenient time-saver, creating the VI from a template and configuring it with an input and output of the selected class.

Should all class member VIs be dynamic? Probably not. The overall design will be clearer if only the VIs that you intend to override in child classes are dynamic. Note that you can easily change a member VI between dynamic and non-dynamic by configuring the connector pane terminals. In previous versions, a connector pane terminal could be Required, Recommended, or Optional. In LabVIEW 8.20, there is a new option called Dynamic Dispatch.

An override member VI is a dynamic VI that has the same name as a member VI in one of the class's ancestors. Again, there is a right-click New option on the class in the project tree that helps you create them.

A dynamic VI and its override VIs in child classes are a set of VIs that perform the same operation for a hierarchy of classes. We call the operation a method (from classic OO terminology), which means a method on a class is a VI or set of VIs.

Let's look at an example. In our new Getting Started window, we have an object to manage each of the link buttons. All of these objects are instances of classes that inherit from Link.

In the Link class, we have a dynamic VI called InitFromXML.vi. This VI parses a section of an XML file to get the data values that are stored in Link's private data cluster.

Now, if we look at the Web class, which inherits from Link, it also has an InitFromXML.vi. This VI parses the value that the Web class knows about (URL) from the XML. But it needs to do more. It needs to have its parent class do whatever work it does for InitFromXML. So it uses the Call Parent Method function.


This kind of override VI extends the functionality of its parent class.

If you look at another VI in Web, HandleItemActivation.vi, you'll find an override VI that replaces the functionality of its parent class (because it does not use the Call Parent Method function).

So, in summary of my point today, dynamic VIs allow you to extend or replace the functionality of a class in its child classes.

Labels:

Sunday, August 27, 2006

Code Reuse through Classes

Before LabVIEW 8.20, code reuse primarily meant writing good subVIs. With LabVIEW 8.20, you can also reuse code with well-designed classes.

Let's look at the OO GSW example from my previous post. There are two kinds of code reuse demonstrated here: inheritance and delegation.

If you look at the LabVIEW Class Hierarchy window (found in the View menu), you can see that all the different link handlers inherit from a Link class. Making a common ancestor class allows us to do several things: put common data fields in the Link class private data; share common functionality in methods on the Link class; and define interfaces for dynamically dispatching on this hierarchy of objects (more on this last point in a future post).

Having a common ancestor class also allows us to create arrays where each element is a different class. That's right, that means having an array where each element is a different type! And because of dynamic dispatching, you can iterate through an array, call a particular method on each element, and dynamically call an appropriate VI to do that operation on that type of object.

Of course, you may notice that you actually get the ability to create arrays of different classes automatically. In the LabVIEW Class Hierarchy window, you can see that all classes in LabVIEW inherit from a common ancestor class. We call this class LabVIEW Object. It has no private data or methods, and you cannot edit it.

You may also notice, in the LabVIEW Class Hierarchy window, a second class that inherits from LabVIEW Object called ProjectWizard.

When you have certain modules (like Real-Time) installed, the Getting Started window changes. One of the links in the New section becomes a link to a module's New Project Wizard. Also, a Targets ring becomes visible in the lower left, which shows all the module project wizards available. Clicking on the new project link in the New section or selecting the corresponding item in the ring and clicking Go both do the same thing.

I designed my class hierarchy with two kinds of links: clickable text and ring items. In the module New Project Wizard case, there are links of each type that need to share functionality. Should I put the common data and methods in the ancestor class, Link? No, because then all the kinds of links that don't open project wizards would needlessly share them.

Instead, I create a helper class that launches project wizards, and I put an object of that class in the private data of both ProjectWizardClickableText and RingItemProjectWizard. This is called delegation.

As I've said before, there's lots more to talk about on this example, but I want to keep each post short, so that's all for today. Thanks for reading!

Labels:

Tuesday, August 22, 2006

An Object-Oriented Getting Started Window

Today, I'm going to share with you a feature that's currently in development for a future version of LabVIEW. It's a new version of the Getting Started Window (GSW).

My goal for this project is to change the content definition of the GSW to a user-configurable XML file. (This means you will be able to change the items on the right to the functionality of your choice).

My approach used LabVIEW Object-Oriented Programming. I'm sharing this with you because I think it is a good example of several LabVOOP principles.

Disclaimer: I am providing these VIs only as an example. Although they are a functional replacement for the Getting Started Window that shipped with LabVIEW 8.20, they have not undergone the verification and validation of a released product.

(edited January 22, 2007) The VIs are no longer available on NI's FTP site. If you e-mail me at my gmail account, I can send them to you.

(edited August 21, 2007) There is a shipping example in LabVIEW 8.5 (Navigation dialog) that is a simplified version of these VIs. You can download the same files in LabVIEW 8.2.1 format here).

I highly recommend that you explore the VIs using the project file, which organizes them into a hierarchy. A few of the subVIs are password-protected, but I don't think they interfere with seeing LabVOOP in action. You can run the top-level VI (GSW_Main.vi) and stop it by clicking the close box on the window.

The general idea of the design is that the panel contains buttons for the links, and I associate each button with a handler object that defines the button's displayed text and the functionality when the user clicks it.

There's too much to discuss in a single post, so I'm going to be talking about this example for awhile.

Labels:

Thursday, August 17, 2006

Dynamic Dispatching

Encapsulation and inheritance are good features, but the part of LabVOOP that I believe really takes the cake is dynamic dispatching.

Dynamic dispatching is, however, a little difficult to explain. Here goes...


Consider this diagram snippet. We have a wire of a certain datatype, carrying data of a certain datatype, passing that data into a subVI.

Before LabVIEW 8.2, you knew for certain that the data on the wire was the same type as the wire, and that the VI that opened when you double-clicked on the subVI was the one that would execute at run-time.

Both of these are no longer true.

A wire of a class datatype can carry data of that class or any class that inherits from it. So, using our previous example, a Link wire can carry a Link object, a Web link object, or a VI link object.

Dynamic dispatching gives you the ability to call a different subVI, depending on the datatype of the input data. It is run-time polymorphism.

I think this is easier to show with an example, so I'm going to provide one with my next post. Time to get those copies of LabVIEW 8.20 installed! :-)

Labels:

Tuesday, August 15, 2006

The Class: a Cluster of Clusters

Imagine you have some buttons that open web pages when you click on them. You have, for each button, a cluster of the display name and the URL to open when the button is clicked. Now you want to have some buttons run VIs when the user clicks on them, so you make another cluster with the display name and the path of the VI to run.

Well, this isn't really satisfactory, is it? Display name is duplicated in both clusters. And you can't make an array that includes both kinds of links.


Another approach might be to make a unified cluster, with the display name, URL and path. But now you need a way to know whether the URL or the path is valid in a given cluster, so you'd have to add some kind of selector. And, as you add new kinds of links, this cluster is going to grow and grow.


What you really want is to put the common fields in one cluster, and the fields for each specific kind of link in other clusters. This is where classes can help.

So... when I said you can think of a class as a cluster, I kind of lied. Really, you can think of it as a cluster of clusters. If Link is the parent class, and Web link is its child class, then the data for a Web link object includes both the Link private data cluster and the Web link private data cluster.

This is called inheritance. It lets you break out the data and behavior into a logical hierarchy. There's lots more to say about this, but I'll leave that for future posts.

Labels:

Sunday, August 13, 2006

The Class: the Black-Box Cluster Typedef


Classes are fundamental components of object-oriented programming.

In LabVIEW 8.2, you can think of a LabVIEW class (in an extremely simplified view) as a cluster and the VIs that operate on it.

To VIs outside of the class, an object (an instance of a class) is a black box... or, more accurately, a blue cube. They cannot directly access an object's private data (the elements of the cluster).

VIs that are members of the class can bundle and unbundle the class data as if it were an ordinary cluster.

This is called encapsulation.

So, what is this good for? Lots of things, but I'll only list two here:

  • Data modification choke points. If you want to set some probes to find out where a private data element is changing, you know you only have to set them in VIs in the class.

  • Interface stability. If you decide to change your private data (e.g. adding a new element), none of the VIs that use your class have to change, unless they want to use the new element.


You might argue that you could achieve both of these benefits by using a cluster typedef and a set of VIs that read/write the values of each element. And I would agree. But without using classes, there would be nothing to prevent someone from writing a VI that circumvents your plan and accesses the cluster directly.

And, of course, there's much more to object-oriented programming in LabVIEW, as we'll see in future posts...

Labels: