LabVIEW UI Tip: the Resize Objects dialog
I recently pointed out the LabVIEW Resize Objects dialog to one of my coworkers and realized this little gem is probably often overlooked.
Have you ever had someone ask you to make all your buttons a certain number of pixels wide and tall?
When resizing an object in LabVIEW, you get a tip strip that shows the object's size, but it takes a steady hand to get a precise value. And resizing more than one object by hand gets tedious.
But with the Resize Objects dialog, it's super easy. Just select the objects you want to resize and choose the "Set Width and Height..." menu from the Resize Objects ring on the VI's toolbar.

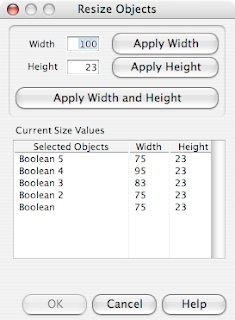
You'll see the Resize Objects dialog, which allows you to change the width and height of the selected objects.

Just a few clicks and you're done!
[P.S. I just realized that I forgot to give my buttons proper labels before taking the screenshot. Just pretend the labels are the same as the text on the buttons, please. Thanks!]
Have you ever had someone ask you to make all your buttons a certain number of pixels wide and tall?
When resizing an object in LabVIEW, you get a tip strip that shows the object's size, but it takes a steady hand to get a precise value. And resizing more than one object by hand gets tedious.
But with the Resize Objects dialog, it's super easy. Just select the objects you want to resize and choose the "Set Width and Height..." menu from the Resize Objects ring on the VI's toolbar.

You'll see the Resize Objects dialog, which allows you to change the width and height of the selected objects.

Just a few clicks and you're done!
[P.S. I just realized that I forgot to give my buttons proper labels before taking the screenshot. Just pretend the labels are the same as the text on the buttons, please. Thanks!]
Labels: user_interface

2 Comments:
Hi and lot of thanks for your blog. I've got 2 questions :
- Are you using a Macintosh for LabVIEW development ?
- What are the plans to Mac OSX support for the future (DAQ-mx mainly)
Thank youin advance
I use both Windows and Mac machines, but I usually do development on Windows. My home computer is a PowerBook, and that's why I often have Mac screenshots here on my blog.
Unfortunately, I can't comment about future plans of NI products. Sorry! I recommend that you ask your NI sales rep.
Thanks for reading!
Post a Comment
<< Home